LEASED LAPTOP LOGIN AND USAGE GUIDE 2023
Version 3.0 Classification: Confidential By: Tekihealth Support
The process of signing in and making use of the Tekihealth leased laptop is as follows:
-
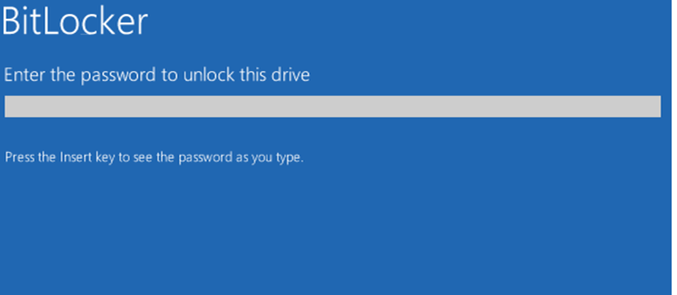
Unpack and Power on the laptop. It will ask you for your bitlocker PIN. This is the last four digits of your laptop number printed on the stickers at the back and front of your laptop i.e if your laptop name is Tekihealth0012, then your PIN will be 0012.
Note: If the wrong PIN is entered several times, the laptop will ask you to enter a Bitlocker recovery key. The quickest fix to this is to restart your computer by holding on the power key. The laptop will restart and give you the option to enter your PIN again. The bitlocker recovery key can only be obtained by contacting Tekihealth support at support@tekihealth.com or completing the ticket form available at https://tekihealth.com/support . So please ensure that you enter the correct PIN.
2. After the correct bitlocker PIN has been entered, you will progress to the login page.
3. On the login screen, there are two accounts on the laptop to choose from as follows:
-
Admin: – This is for Tekihealth Support and administration purposes and should not be deleted from the laptop.
-
Tekihealth: – This will have your laptop number i.e Tekihealth0012. This is the login account allocated to you for the period of your lease with us. Select this and enter the temporary password as Tekihealth01and tap enter. You should now be successfully logged into the laptop.
4. Changing your Password: Once logged in, press on the key combination of Ctrl, Alt and Delete at the same time. The computer will automatically bring up a screen with options as follows: Click on the Change a password option.
Enter the current Password as Tekihealth01 and choose your preferred Password. Confirm your chosen Password and submit or tap enter.
* Use a Strong password i.e one that’s unlikely to be guessed. In most cases, a strong Password will be Alphanumeric and ideally starts with a capital letter as opposed to simple passwords such as Password10. An example of a strong password is M3ngo12@ or Mang012@
5. Connecting to the N3 (HSCN) network and other applications:
i). Click on the Anyconnect VPN icon available as a shortcut on both your desktop and task bar as follows:
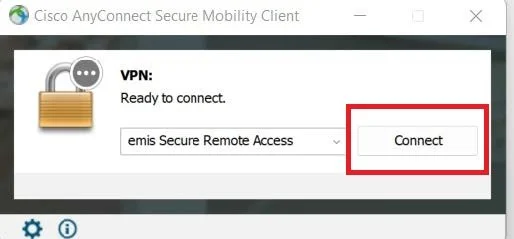
ii). Click on connect on the pop up screen as follows:
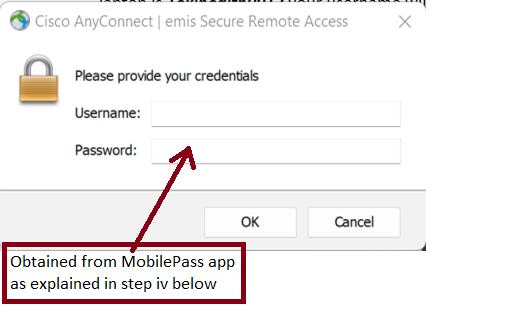
iii). On the next pop up screen, enter the username as 141575Tekihealth followed by the last 3 digits of laptop number (for those with laptop numbers 0 – 60) then followed by @egton i.e if your laptop is Tekihealth0012 your username will be 141575Tekihealth012@egton. For those with laptops from 61 onwards, your username is 141575Tekihealth followed by the last 4 digits of laptop number then @egton i.e if your laptop number is Tekihealth0061, your username will be 141575Tekihealth0061@egton.
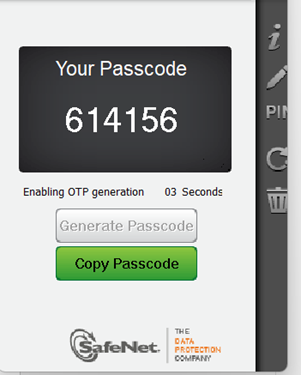
iv). The Password is a unique passcode obtained from the MobiPass authenticator app which is used alongside the VPN client for strengthened security. The steps to obtaining the password are as follows:
a. Click on the Mobilepass icon available as a shortcut on both the desktop and taskbar as follows:
b. Click on your profile saved as the same as your laptop name i.e Tekihealth0012 or 141Tekihealth012.
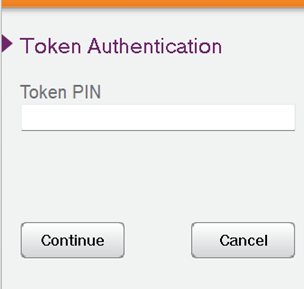
c. On the next screen, enter your PIN as the last 4 digits of your laptop i.e 0012 if your laptop name is Tekihealth0012 and tap enter or click on continue.
d. The app will now provide you with your onetime password as follows: Click on the Copy passcode button to copy it for use on your VPN client Window.
v. Enter the passcode copied from step iv above and click on OK.
*If the correct credentials are entered, the VPN will show a message to indicate its been successfully connected. If not, it will show you one or multiple error messages. If you get any connection error, close both Cisco Anyconnect and the mobilePass apps and retry. If the problem is persistent, contact us using the details below.*
Contact us at support@tekihealth.com or www.tekihealth.com/support/ if you have any queries or encounter any issues while using this user guide.


